Buy Credits

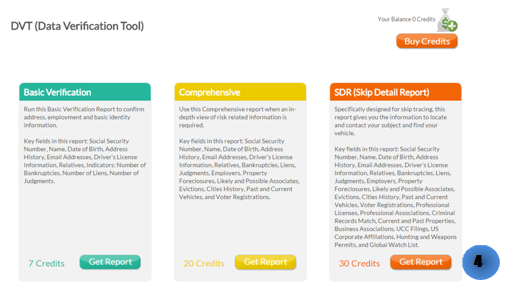
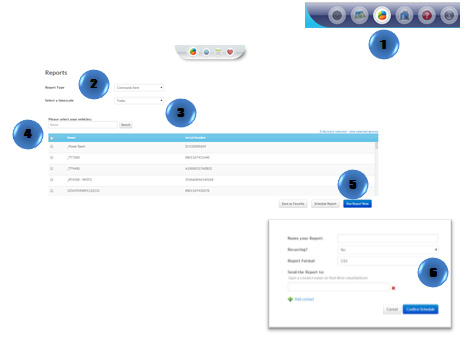
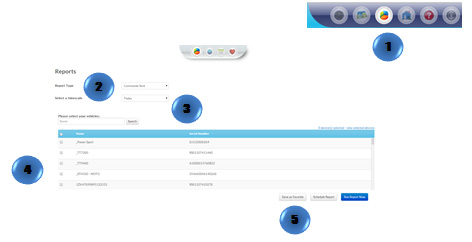
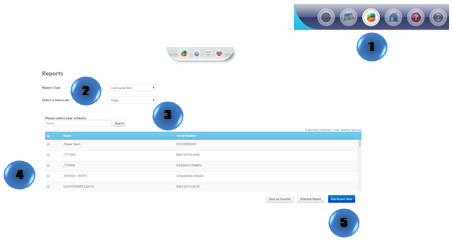
  1. Click on the “DVT” icon on the toolbar
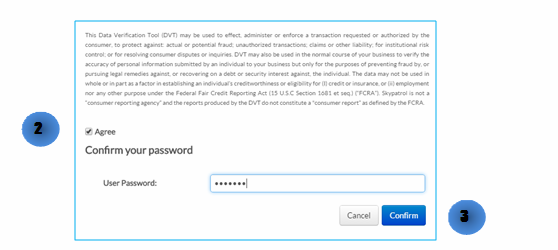
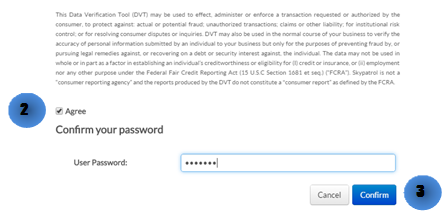
  2. Check the box to agree with the disclaimer
  3. Confirm your password to run the report.
  4. Click on “Buy Credits” Button
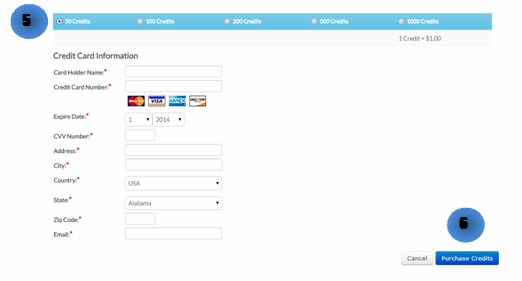
  5. A new window will appear. Select the amount of credits that you want to purchase
  6. Fill out the required information and click on “Purchase Credits”

Buy Credits 1 Buy Credits 2 Buy Credits 3 Buy Credits 4

Renew Device(s)

  1. In the Map View, select the vehicle/device to renew. Click on the blue arrow. An information bubble will appear next to the selected vehicle. Click on “Renew Device”

Or

  1. Click on “Renewals” icon on the toolbar.
  2. Select the desired renewal period
  3. Click on “Renew & Pay” button
  4. Type in payment information
  5. Click on “Confirm” button

renew-devices

Upload Device

  1. Click the “Devices” icon on the toolbar.
  2. Click on the “Upload” icon
  3. Click on “Upload CSV” button. Select the desired CSV file and click on “Open”
  • The .cvs file without financial data should contain columns titled: Unit Name, Serial Number, VIN, and Stock Number in this order. Up to 100 records per file. Each row much contain data.
  • The .cvs file with financial data should contain columns titled: Loan Amount, Contract Date, Date Sold, Loan Term, Due Date, Current Balance, Payment Due, Last Payment Date, Last Payment Amount, and Days Past Due in this order.

Upload Device 1

Upload Device 2

Locate Now

  1. In the Map View, select the vehicle/device to locate
  2. Click on the “Locate Now” icon on the taskbar.

locate-now

Or

  1. In the Map View, select the vehicle/device to locate. Click on the blue arrow
  2. An information bubble will appear next to the selected vehicle
  3. Click on “Locate Now” button

To access Google maps and get a satellite view of the location click on the latitude and longitude coordinates on the information bubble.

Locate2

Renew Multiple Devices

  1. In the Map View, go to Quick View Status at the bottom right of the screen, Click on the red listed number that shows the device(s) coming up for renewal.

Or

  1. Click on “Renewals” icon on the toolbar.
  2. The renewal page will show up. Choose all devices to be renewed. To select all, click the checkbox on the bar.
  3. Click on “Renew & Pay” button
  4. Type in payment information
  5. Click on “Confirm” button

renew-multiple-devices

Renew Multiple Devices by Uploading a File

  1. In the Map View, go to Quick View Status at the bottom right of the screen, Click on the red listed number that shows the device(s) coming up for renewal.

Or

  1. Click on “Renewals” icon on the toolbar.
  2. The renewal page will show up. Click on the “Upload File”  icon located to the right of the window
  3. A new window will appear
  4. Click on “Upload CSV” select the file and click on “Open”

The .csv file should contain the following columns: Unit Name, Serial Number, and Renewal Period. Up to 100 records per file.

Note: By clicking on the “Export to CSV” icon located to the right of the window a template can be downloaded.

renew-devices-upload

Edit Device

  1. In the Map View, select the vehicle/device to edit. Click on the blue arrow. An information bubble will appear next to the selected vehicle. Click on “Edit Device” button

Or

  1. Click the “Devices” icon on the toolbar. Select the vehicle to be edited. Click on “Edit” button
  2. Enter in all necessary information. This screen also has access to “Repo Mode”, “Transfer”, “Change Avatar,” and “Enable Payment Reminder.”
  3. Click on “Save Changes” button

edit-device

Create Geofence(s)

  1. Click on “Geofence” icon on the toolbar
  2. Click “Add New Geofences” bottom
  3. Type in the Name of the Geofence
  4. Locations for Geofence can be created by typing an address, (adding latitude and longitude) or by simply clicking the location in the map. Choose between the options at the top of the map to create the Geofence:  “Add a marker”, “Draw a shape”, “Draw a circle”, “Draw a rectangle”, “Settings”, and “Eraser”
  5. Select a group.
  6. Select yes or not to Create an Alert
  7. Click “Add Geofence”

create-geofence

Enable Starter

  1. In the Map View, select  the vehicle/device
  2. Click on the “Enable Starter” icon on the Toolbar

enable-starter1

Or

  1. In the Map View, select the vehicle/device to locate. Click on the blue arrow
  2. An information bubble will appear next to the selected vehicle
  3. Click on “Enable Starter” button

enable-starter2

Disable Starter

  1. In the Map View, select  the vehicle/device
  2. Click on the “Disable Starter” icon on the Toolbar

disable-starter1

Or

  1. In the Map View, select the vehicle/device to locate. Click on the blue arrow
  2. An information bubble will appear next to the selected vehicle
  3. Click on “Disable Starter”

disable-starter2

Edit Geofence(s)

  1. Click on “Geofence” icon on the toolbar
  2. Select the Geofence to be edited and click on “edit”
  3. Make desired changes
  4. Click on “Save” or “Cancel”

edit-geofence

Transfer History

  1. To see all transfer history Click on the “Transfer Management” icon on the toolbar in the map view.
  2. In the Transfer Management, you will see all transfer history including date transferred, date accepted and status of requests.

transfer-management

Transfer History Step 2

Request Device Transfer

Request-Device-Transfer-12 1. In the Map View, select a vehicle in the device manager list to be transferred. 2. Click the Transfer Command Icon in the taskbar. If the icon is not shown on the taskbar, click the pencil icon and then click on the Transfer Command icon in the pop up window. Transfer-Devcies-34a4b5 3. The “Transfer Device(s)” screen will appear.   4a. To transfer a device to another group or sub-account within your account, select the folder to transfer the device. If necessary, use the search field to find the account folders to find a specific sub-account.   4b. To transfer a device outside your account to another Defender’s account, type the email address of the contact you want to transfer the device.   5. Review the information to ensure accuracy and click the “Transfer” button.  

Accept Device Transfers

Accept-Device-Transfers

  1. In the Map View, click on the Transfer Management Icon. If the icon is not shown on the taskbar, click the pencil icon and then click on the Transfer Management icon in the pop up window.

Accept Device step 2 2. Click the green check mark on the device you want to accept to be transferred to your account.      To accept all pending requests, simply click on the “Accept all requests” button above the blue        bar. Accept-Device-step-3 3. A confirmation box will appear on the screen. Click “Ok” to confirm the acceptance of the transfer.

Add User

Administrator’s accounts have the ability to create, edit and delete users.

  1. Click on the “Users” icon on the toolbar in the map view
  2. Click “Add New User”
  3. Enter user information
  4. Click on “Save”

create-user

Resend Transfer

Accept-Device-Transfers 1. In the Map View, click on the Transfer Management Icon. If the icon is not shown on the taskbar, click the pencil icon and then click on the Transfer Management icon in the pop up window.

Resend Transfer step 2
2. Find the device you want to resend a transfer request, and click on the mail sign. To resend all requests, click the “Resend all requests” button above the blue bar.

Resend-Transfer-step-3 3. A confirmation box will appear. Click Ok to confirm the Resend Transfer option.

Reject Device Transfer

Accept-Device-Transfers 1. In the map view, click on the Transfer Management Icon. If the icon is not shown on the taskbar, click the pencil icon and then click on the Transfer Management icon in the pop up window.

Reject Device Transfer step 2
2. Find the device transfer you would like to reject and click the stop sign icon. To reject all requests, click the “Reject all requests” button above the blue bar.

Resend-Transfer-step-3 3. A confirmation box will appear on the screen. Click “OK” to confirm the request.

Naming the Device/Vehicle

  1. In the Map View, select the vehicle/device to edit. Click on the blue arrow. An information bubble will appear next to the selected vehicle. Click on “Edit Device” button

Or

  1. Click the “Devices” icon on the toolbar. Select the vehicle to be edited. Click on “Edit” button
  2. Type in the new name in the device name box
  3. Click on “Save Changes” button

name-the-device

Batch Command

  1. Click on the “Batch Command” icon on the toolbar
  2. A new window will appear
  3. Click on “Upload CSV” select  the file and click on “Open”

The .csv file should contain the follow columns in this order: Unit Name, IMEI and Serial Number. Up to 100 records per file.

batch-command

Delete Geofence(s)

  1. Click on “Geofence” icon on the toolbar
  2. Select the Geofence to be deleted
  3. Click on “Delete” A confirmation message will appear. Select “OK

delete-geofence

Change Device/Vehicle Avatar

  1. In the Map View, select the vehicle/device to edit. Click on the blue arrow. An information bubble will appear next to the selected vehicle. Click on “Edit Device” button

Or

  1. Click the “Devices” icon on the toolbar. Select the vehicle to be edited. Click on “Edit” button
  2. Click on “Change Avatar” button
  3. Select one of the pre-loaded images or click on “Upload your avatar” select  the image and then click on “Open”
  4. Click on “Save Changes” button

change-device

Repo Command

  1. In the Map View, select  the vehicle/device
  2. Click on the “Repo Mode” icon on the toolbar
  3. A new window will pop-up. Fill out and review the information
  4. Click on “Confirm Repo”

repo-command

Or

  1. Locate your vehicle/device.
  2. Click on your vehicle/device in the map. A new information bubble will appear. Click on “Repo”
  3. Follow steps 3 and 4

repo-command2

Create Alert(s)

  1. Click the “Alerts” icon on the toolbar
  2. Click on  “Add New Alert” button
  3. Click on “Add Device” button
  4. Type in the alert name
  5. Select the alert type from the drop-down box
  6. Fill out all required information. (Every alarm type has different fields)
  7. Check the information and click on “Save” button

create-alerts

Create Group(s)

  1. Click on “Groups” icon on the toolbar
  2. Click on “Add New Group” button
  3. Fill out all required information: Name of the Group and Contact Name (This screen has also access to “Repo Mode” and “Transfer Mode”)
  4. Click on “Save”

create-group

Quick Report

  1. In the Map View, select  the vehicle/device
  2. Click on the “Quick Report” icon on the toolbar

quick-report1

Or

  1. In the Map View, select the vehicle/device to locate. Click on the blue arrow
  2. An information bubble will appear next to the selected vehicle
  3. Click on “Quick Report”
  4. A new window will appear
  5. Select the type of report desired

* The icon invalid-gpswill appear if the device is sending an invalid GPS message and the last valid signal will be displayed

quick-report

Edit User

  1. Click on the “Users” icon on the toolbar in the map view
  2. Select the user to be edited and click on “Edit”
  3. Make the desired changes
  4. Click on “Save”

edit-user

Delete User

  1. Click on the “Users” icon on the toolbar in the map view
  2. Select the user to be deleted and click on “Delete”
  3. A confirmation message will appear. Select “Delete”

delete-user

Upload Geofence(s)

  1. Click on “Geofence” icon on the toolbar
  2. Click on “Upload Geofences” button
  3. Click on “Choose file,” select  the desire .csv file and click on “Open”

The .csv file should contain eight columns titled:  Name, Street Address, City, State, ZIP, Latitude, Longitude, and Radius. Information in Radius column is not mandatory. Up to 100 records per file.

upload-geofence

Customer Payment Reminder Notification

  1. In the Map View, select the vehicle/device to edit. Click on the blue arrow. An information bubble will appear next to the selected vehicle. Click on “Edit Device” button

Or

  1. Click the “Devices” icon on the toolbar. Select the vehicle to be edited. Click on “Edit” button
  2. Click on “Payment Reminder” and the form will show up at the right of the screen
  3. Fill out and select all required information: notification method, payment schedule, reminders and notification message.
  4. Click on “Save Changes” button

payment-notification

Edit Alert(s)

  1. Click the “Alerts” icon on the toolbar
  2. Select the alarm to be edited
  3. Click on “edit” button
  4. Type and/or select the new information
  5. Review the information and click on “Save” or “Cancel”

edit-alerts

Transfer Device

  1. In the Map View, select  the vehicle/device
  2. Click on the “Transfer Command” icon on the toolbar
  3. A new window will appear. Select between “Transfer inside my account” or “Transfer outside my account”
  4. Select the group to transfer the device
  5. Click on “Transfer”
  6. A new window will appear for review. Click on “Confirm Transfer”

transfer-device1

Or

  1. Locate your vehicle/device.
  2. Click on your vehicle/device in the map. A new information bubble will appear. Click on “Transfer”
  3. Follow steps 3 through 6

transfer-device2

Edit Group(s)

  1. Click on “Groups” icon on the toolbar
  2. Select the “Group” to be edited and click on “edit”
  3. Type the new information
  4. Review the information and click on “Save” or “Cancel”

edit-group

Delete Group(s)

  1. Click on “Groups” icon on the toolbar
  2. Select the Group to be deleted and click on “Delete”
  3. A confirmation message will appear. Select “Delete”

delete-group

Delete Alert(s)

  1. Click the “Alert” icon on the toolbar
  2. Select the alarm to be deleted and tick the checkbox to the left of the alarm name. If you want to delete all alerts, tick the checkbox at the very top of the list of alerts.
  3. Click on “Delete” button.
  4. A confirmation message will appear. Select “OK”

To delete all alerts, tick the checkbox located at the left side of the bar and then follow step 3

delete-alerts

Schedule Reports

  1. Click the “Reports” icon on the menu bar
  2. Select the desired report type
  3. Select a time scale
  4. Check the device(s) to be included in the report
  5. Click on “Schedule Report” button
  6. A window will pop-up. Fill out the required information and click on “Confirm Schedule” button

schedule-reports

Set Report as a Favorite

  1. Click the “Reports” icon on the menu bar
  2. Select the desired report type
  3. Select a time scale
  4. Check the device(s) to be included in the report
  5. Click on “Save as Favorite” button

set-report-favorite

Run Report Now

  1. Click the “Reports” icon on the menu bar
  2. Select the desired report type
  3. Select a time scale
  4. Check the device(s) to be included in the report
  5. Click on “Run Report Now” button

run-report-now

Previous Reports

  1. Click the “Reports” icon on the menu bar
  2. Click the “Previous Reports” icon in the bar
  3. Select a report
  4. Click on “Run Report” button

previous-reports

Delete a Scheduled Report

  1. Click the “Reports” icon on the menu bar
  2. Click the “Scheduled Reports” icon in the menu bar
  3. Select the report to be deleted
  4. Click on “Delete Selected” button

delete-scheduled-report