
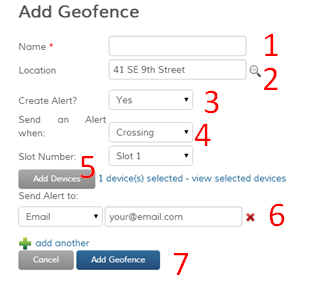
1. Name your Geofence by filling in the ‘Name’ box.
2. Locations for Geofences can be found in two ways. You can manually find the area on the map, or you can use the Find Address feature. The Find Address feature can be used by entering an address or location in the ‘Location’ box. After filling in the ‘Location’ box, click the ‘find address’ button. Now that you found your location, follow the instructions below to draw a Geofence.
3. If you would like to create an alert for this Geofence, select “Yes” from the ‘Create an Alert?’ drop-down box. If not, skip down to instructions for drawing Geofences.
4. Select when you would like to be alerted. The options are entering, exiting and crossing. By selecting “entering,” you will receive an alert when the vehicle enters the Geofence. By selecting “exiting,” you will receive an alert when the vehicle leaves the Geofence. If you select “crossing,” you will be alerted after the vehicle has both entered and exited the Geofence.
5. Click the ‘Add Devices” button and select the appropriate devices.
6. Choose how you would like to be alerted. To use email, select “Email” and enter your email address. For SMS alerts, select “SMS” and enter your phone number (no dashes) and your cell phone provider.
7. After drawing your Geofence using the steps below, click the ‘Add Geofence’ button to save your Geofence and alert.